How to Make Lego Minecraft Mini Figures
Brand your own minifigures
This page gives a tutorial for creating your own custom minifigures. I've provided step past step instructions, parts lists, and image files for a handful of figures. Below that, the bottom of the page has tables of additional image files for many other custom minifigures. This artwork is copyrighted by me and the source textile is copyrighted by the authors of the novels referenced below, then under no circumstances may these designs be used for whatever commercial purpose any. Y'all may not modify them or redistribute them without permission. (Sorry for all that, I just want to make sure the authors' rights are respected.)
I think this is all within the usual fan fine art norms, simply if you are an author or stand for ane and you take issue with this, please let me know at  and I will modify this folio per your management.
Overview of the procedure
The steps involved in creating a minifigure are:
- Order the parts you need, with help from the part lists below. My part lists are ready in the XML format used past bricklink.com, a reputable third-party lego marketplace. Advanced users may find parts more cheaply at Bricks and Pieces, run past The Lego Group.
- Utilise Brasso (a multi-purpose metal polish) and a make clean rag to remove existing print from any pieces that demand to be printed on, if blank parts weren't available.
- Utilise waterslide decals or a lego printing service to apply the designs to the lego elements.
- Physically modify the lego elements past drilling, sanding, or painting. This is rare.
The residuum of this page goes over these steps in more detail and then provides designs and part lists for creating specific characters.
Step i: order the parts
The easiest identify to lodge the parts yous need is bricklink.com. This is a large marketplace with thousands of resellers. Their feedback system makes the site reliable so long as you cheque the feedback of a seller before you lot buy. Offset, you need to create an business relationship. Next, yous need to set upwards a wanted list for the parts. The XML files linked beneath should exist cut-and-paste into the XML tab of the wanted list upload page, and so each file volition create a split wanted list for each minifigure. (Come across this page for an explanation of the XML format.) In one case yous accept all the parts uploaded, use the buy page to purchase the items you want.
If you lot are an advanced user, you can utilize lego'due south official Bricks and Pieces site to buy parts. You demand to know the exact part number you need, and many minifig parts do non use the same numbering organisation as on Bricklink. Torsos are element number 76382, plain legs are element number 73200, and beyond that you are on your own.
Tips for saving money: Consider using the search folio and price guide (located in the top right of the catalog page for an item) in Bricklink to find alternating parts in the aforementioned color. You might select an alternate design that is more common, or supervene upon a bare part with a printed part and then remove the printing with Brasso. Official minifigure capes tin can exist rare and expensive; the Bricklink seller CapeMadness makes standard and custom capes that are generally cheaper than official lego capes and are but as good. You lot can as well change the required part condition from new (N) to used (U), but I advise confronting information technology since the arms or legs may be loose or the press may be damaged.
Step 2: remove existing printing
In some cases, at that place is no cheap way to go a bare lego chemical element in the color yous require. In that case, you can purchase an element that already has press, and remove the printing. This is unproblematic but requires effort. Start, dissasemble the parts to exist wiped. For a torso, carefully pull the arms off. I do this by putting the arms straight back, grasping the entire arm, and then gently levering it outwards. For legs, it is easier if you lot accept a torso attached to the "hips" portion; then grab a leg on the upper front and back sides and pull laterally. You lot may want to practice with actress, low-value parts first until you are sure you tin can do this without damaging the parts.
At present you tin use Brasso (a multi-purpose metal smoothen) and a clean rag to remove the press. Utilize a small amount of Brasso to the press, then vigorously rub the rag over the printing until it is all gone. It may have a few minutes before you come across whatsoever alter whatsoever, so this can be tiring. I recommend but doing a few parts at once, else you will potentially strain a hand muscle. Make sure you lot identify some paper or a magazine underneath the office so that you don't accidentally damage your work surface.
Finally, thoroughly wash and dry the parts and your hands. Reassemble the legs, just it may exist best to ship the armless torsos to the printer and reapply the arms when the parts are returned to you. This is because they may remove the arms during printing, and it is best to minimize the number of times that the figure is disassembled. Check with your impress company (run across adjacent pace).
Step iii: apply the designs
The easiest way to create your own characters is to download the designs and then ship them to a custom lego printer such as Bricksanity, minifigs.me, or MinifigFX. Prices will typically exist $5-$7 per role plus shipping. Bricksanity is based near London, Uk. They are very flexible; you can provide the parts or have them do so; they are flexible in how they print (e.thou. arm press or printing on multiple sides of a minifigure), and they take large or small orders. However, the possessor is quite busy and this can sometimes delay orders. Minifigs.me is based in Sheffield, U.k.. They are the near streamlined service in that everything is washed through their website, they take a large staff allowing each to focus on his/her tasks, and orders are filled promptly. However, they only print using the somewhat express options on their website, and I've had three items mis-printed from them. I'd recommend them if you are new to this and was a very explicit process to follow, but they are non platonic for avant-garde users. MinifigFX is based in North Carolina, USA. Their quality is a piddling bit lower, but their prices are too lower and they are flexible in what they print on. If you are in the US, you will as well save money on shipping (aircraft parts between the United states and UK is around $xi each way). I'd recommend them if yous are on a budget.
A cheaper selection is to use waterslide decals. The cost volition be about $ane per letter size folio of decal newspaper, plus the toll to use a high-quality color laser printer, plus the price for various solvents and elevation coats if you desire to improve the finish a bit. You tin buy packs of decal paper from Amazon (I utilize the brand with the unfortunate name of "Blinggasm") or from decalpaper.com. In the USA, packs come in multiples of 10 sheets for $1/sheet. There are two options: "clear" and "white." "Clear" volition allow the part underneath prove through wherever you don't choose to print; nevertheless, lighter colors will not show upwardly well, peculiarly if the decal is applied to a dark lego element. "White" paper has a white backing so lighter colors show up meliorate, but you must print everything that doesn't demand to be white, so you take to exercise your best to lucifer the underlying role color in areas that don't need whatever special press. There will as well exist a thin white line around the border due to the pocket-sized vertical face on the edges of the decal. Ideally, use light amplification by stimulated emission of radiation printing so the ink won't run when it gets wet. To apply the decal, cut it to the size of the part, dip information technology in water for v seconds, wait some other 5-10 seconds, then gently slide the backing off and apply the backless decal to the role. It definitely takes practice, so I recommend printing multiples of each design to allow for mistakes.
You can meliorate the quality of your decal work by using micro set, micro sol, and a top coat such as micro apartment. Apply a paint brush to utilise a layer of micro ready immediately before you utilise the decal. Afterward information technology is practical, utilize a different brush to apply micro sol to any parts of the decal that you want to be more flexible (such equally effectually the border of a lego element); it will profoundly reduce the structural integrity of the decal and mold information technology to the part. Finally, 24 hours afterwards, utilise a third brush to use a later of micro apartment as a meridian coat to protect the decal, and give it another 48 hours to dry out before y'all handle it.
Guides for specific minifigures
 | Rand al'Thor (book 1):
|
 | Mat Cauthon (with Foxhead):
|
 | Perrin Aybara (bearded):
|
 | Mat Cauthon (as Tylin's Toy):
|
 | Queen Tylin Quintara:
|
 | Loial:
|
Now that you have some practise, you can utilise the designs below to make additional figures.
Designs for Bike of Time Lego Characters
The designs beneath are intended to depict characters from Robert Jordan'due south The Wheel of Fourth dimension. This artwork is not endorsed by Robert Jordan, his estate, or the Bandersnatch Group.
For each pattern below, download the file in the "Printable PNG file" column, not the "Case" column. The latter shows how it will look when printed, the former has bare areas to permit the underlying role to show through. These files are sized for 600 dpi.
| Character | Part Description | Utilise to: | Printable PNG file | Example (after printing) |
| Moiraine | Head with gem | Lite flesh head | head-moiraine.png |  |
| Loial | Head with long eyebrows | Light flesh head | head-loial.png |  |
| Ba'alzamon | Head, flames | Light flesh caput | head-baalzamon.png |  |
| Sammael | Head with scar | Light flesh head | head-sammael.png |  |
| Sea folk #1 | Head, chain with iv medallions | Dark mankind (blood-red brown) head | head-seafolk1.png |  |
| Sea folk #2 | Head, chain with 3 medallions | Dark flesh (cherry-red brown) head | head-seafolk2.png |  |
| Bounding main folk #3 | Head, chain with 2 medallions | Dark mankind (reddish dark-brown) caput | head-seafolk3.png |  |
| Lanfear | Trunk, scoop-neck wearing apparel | White trunk | torso-lanfear.png |  |
| Graendal | Torso, low V-neck wearing apparel | Green trunk | trunk-graendal.png |  |
| Matrim Cauthon | Body with foxhead | Reddish-dark-brown trunk | torso-mat.png |  |
| Berelain | Body with strapless gown | Blue torso | body-berelain.png |  |
| Grolm handler | Torso: armor with three eyes | Green torso | torso-grolm.png |  |
| Aviendha (Altara) | Torso with oval cutout; snowflakes | Blue trunk | trunk-ebou-avi.png |  |
| Elaine (Altara) | Torso with oval cutout | Green torso | torso-ebou-ela.png |  |
| Nynaeve (Altara) | Body with oval cutout; Lan'due south ring | Blue torso | torso-ebou-nyn.png |  |
| Queen Tylin | Body with oval cutout; union pocketknife | Light-green body | trunk-ebou-tyl.png |  |
Designs for Characters from Brandon Sanderson's works
The designs below are intended to depict characters from Brandon Sanderson's novels. This artwork is not endorsed past Brandon Sanderson or his visitor, Dragonsteel Entertainment.
For each design below, download the file in the "Printable PNG file" column, non the "Example" column. The latter shows how information technology will look when printed, the erstwhile has bare areas to allow the underlying part to show through. These files are sized for 600 dpi.
| Character | Role Description | Apply to: | Printable PNG file | Example (after printing) |
| Bloodsealer i | Head, neutral expression | White head | head-bloodsealer1.png |  |
| Bloodsealer ii | Head, fierce expression | White caput | head-bloodsealer2.png |  |
| Nalan (Nale, Nin) | Head, scar on cheek | Ruddy-dark-brown head | head-nalan.png |  |
| Wan ShaiLu 1 | Head, glasses | Light tan head | head-shai.png |  |
| Wan ShaiLu 2 | Caput, glasses, vehement | Light tan head | head-shai-fearfulness.png |  |
| Wan ShaiLu 3 | Head, no glasses, scuffed | Light tan head | caput-shai-scuff.png |  |
| Shaizan of the Fist | Caput, no glasses, scar | Light tan head | head-shaizan.png |  |
| Telrii (Elantris) | Head with port vino stain birthmark | Lite flesh head | caput-telrii.png |  |
| Omin (Elantris) | Trunk with jade Korathi pendant | Dark blue grey trunk | body-omin.png |  |
| Seinalan (Elantris) | Torso with jade Korathi pendant, embroidery | Blue torso | trunk-seinalan.png |  |
| Dakhor monk | Torso with bone ridges (front end) | Low-cal flesh torso | torso-dakhor-forepart.png |  |
| Dakhor monk | Body with os ridges (dorsum) | Light flesh torso | trunk-dakhor-back.png |  |
| Dakhor monk | Torso with bone ridges (arms) | Light flesh body | torso-dakhor-arm-right.png torso-dakhor-arm-left.png |  |
Designs for Characters from Jim Butcher's works
The designs below are intended to depict characters from Jim Butcher'due south novels from the series The Dresden Files. This artwork is not endorsed past Jim Butcher or his representatives.
For each design beneath, download the file in the "Printable PNG file" column, not the "Case" column. The latter shows how it will look when printed, the quondam has blank areas to allow the underlying part to testify through. These files are sized for 600 dpi.
| Grapheme | Office Clarification | Apply to: | Printable PNG file | Example (afterward press) |
| Harry Dresden | Torso with black western shirt and silvery pentacle amulet | Black trunk | trunk-dresden.png | 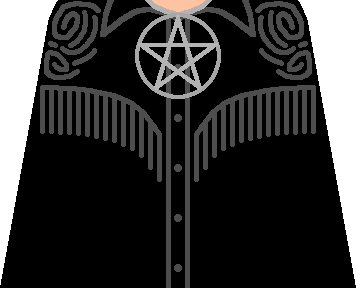 |
| Michael Carpenter | Torso with Templar bailiwick of jersey over plaid shirt | Cerise trunk | torso-michael.png |  |
| Thomas Raith | Torso with black vest over black mesh shirt | Black torso | torso-thomas.png |  |
| Johnny Marcone | Head with greenish eyes | Light flesh caput | head-marcone.png |  |
| Bianca | Head with makeup, fangs | Light flesh caput | caput-bianca.png |  |
| Bianca | Trunk with black dress, deep vee | Black torso | body-bianca.png |  |
Legal stuff
The artwork on this page is copyright 2017-2021 by Richard Martin. The source textile is copyright by the respective authors as noted higher up.
Feel costless to download the images on this page and to apply them for non-commercial purposes. If you wish to re-postal service them online, you may do so as long as you give me credit by either citing me (Rick Martin) as the creative person, linking to this site, and/or linking to my Facebook page or my Twitter account.
I am non affiliated with Robert Hashemite kingdom of jordan, Brandon Sanderson, Jim Butcher, or their representatives in any way.
DOWNLOAD HERE
How to Make Lego Minecraft Mini Figures TUTORIAL
Posted by: jesusdering.blogspot.com


Comments
Post a Comment